Getting started with Terraform
Prerequisites
- (Suggested) Chocholaty installed https://community.chocolatey.org/courses/installation/installing?method=install-from-powershell-v3
- Terraform.exe available locally and in path (
choco install terraform -s https://chocolatey.org/api/v2/). - Azure command line tool (
choco install azure-cli -s https://chocolatey.org/api/v2/) - A pre-existing Azure Resource Group to which the resources will get deployed
- A user account having
contributorrole in the resource group - Access to DevOps and Respositories.
- Have the Terraform repo cloned to your machines
Setup Steps
[!NOTE] Have your Azure AD (not B2C) account ready. Also, your AAD tenant GUID and subscription GUIDs.
Run Terraform to create the resources
- Login to the B2C tenant with
az login --tenant {tenantGuid} - Set the subscription on which the resource group is created
az account set --subscription {subscriptionId} - Open
AuthEngine-IaC.tfvars.jsonand update all the variable values - Run
terraform init - Run
terraform plan -out AuthEngine-IaC.tfplan -var-file="AuthEngine-IaC.tfvars.json" - Verify that the changes are what you would expect.
- Run
terraform apply AuthEngine-IaC.tfplan
Run Terraform output
To configure the variable group, we can use Terraform to output the values of the configuration that we need.
To do this, run terraform output -json > tfoutput.json
Then, open the file. Note that there will be secrets displayed in plaintext here so treat with care.
Azure AD App Registration
Complete the steps given below to set up Microsoft Azure AD app for authentication.
- Log on to the corresponding Azure portal directory with a user having administrative rights.
- Go to Azure Active Directory > App Registration.
- Register a new application under new registration.
- Give an appropriate name to the application.
- Under Supported account types, select Accounts in this organizational directory only ( tenantname - Single tenant).
- Open the newly created application and go to the Authentication tab.
- Under platform configurations, add a redirect URI as given below
- Select 'Add a platform'
- Select 'Single-page application' from the modal.
- Set Redirect URI in the format
{siteurl}/auth. - Get the API application's base url from the terraform output and replace the
{siteurl}. Eg: If the siteurl ishttps://mytestapplicationurl.com, the Redirect URI should be set ashttps://mytestapplicationurl.com/auth
- Make sure Access tokens and ID tokens are selected under Implicit grant and hybrid flows.
- Find Advanced settings and set 'Allow public client flows' to Yes.
- Go to the Certificates & secrets tab, and add a new client secret. Record this secret value.
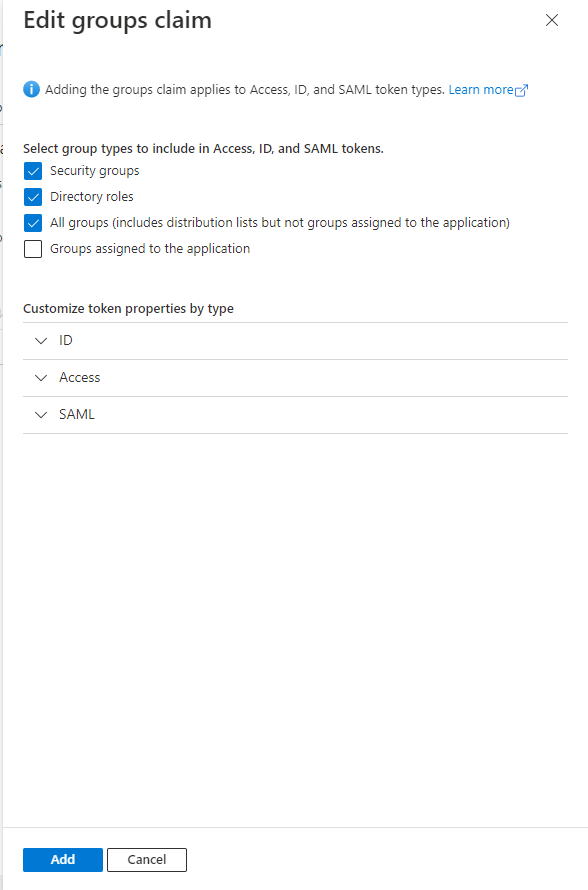
- Go to Token configuration and select Add groups claim. In the modal that opens up, select all checkboxes and save.
-
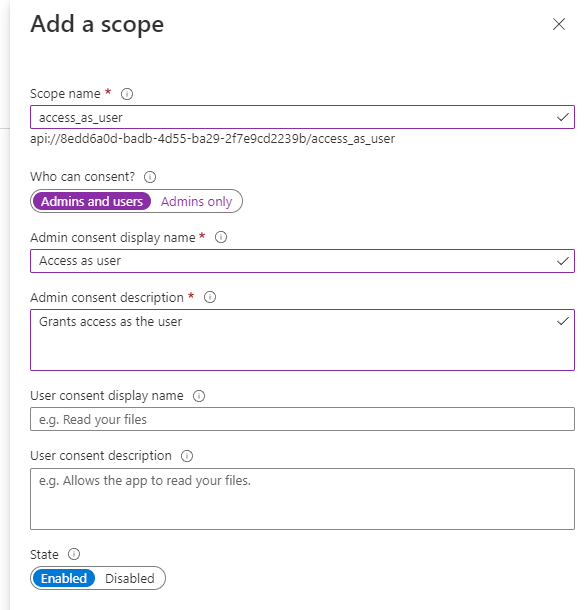
Go to Expose an API tab and add a scope by following the steps below
- Select Add a scope and click Save and continue from modal.
- On the next page, set the scope name as 'access_as_user'.
- Set Admins and users for Who can consent?
- Provide Admin consent display name and Admin consent description.
- Ensure state is Enabled and save it.
-
Select Add a client application, provide the application's id as the Client ID and select the access_as_user scope that was previously created and save it.
-
Go to the API Permission tab and configure it by following the steps given below.
- Add Group.Read.All, GroupMember.Read.All, User.Read.All Microsoft Graph application permissions.
- Add the access_as_user permission created from Add a permission > My APIs > Select the current application.
- Grant admin consent for these permissions.

Configure the B2C Tenant
The B2C tenant whose users the Authorization Engine will be managing. This can be an existing B2C Tenant or a new one. The tenant must be configured as follows:
- Create an Azure AD B2C Tenant - skip if you already have a B2C Tenant.
- Register the Authorization Engine as an application within your B2C Tenant.
Registering RAMPART in your B2C Tenant
The Authorization Engine uses application access tokens to connect to your tenant through Microsoft Graph. To acquire said tokens, an application must be registered for it with the necessary permissions.
-
Click this link to open the Azure Portal and load up Active Directory. Alternatively, open the Azure Portal and search for "Azure Active Directory". Make sure you're in your B2C Tenant.
-
On the left blade, select App registrations and then New Registration.
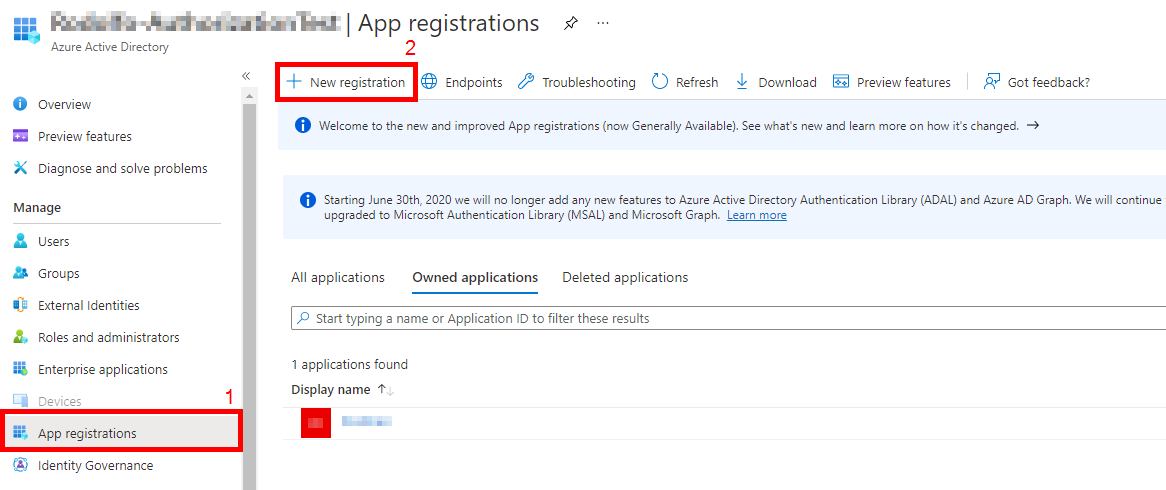
-
In the Register an Application menu:
- Provide the name as "WhoIAM Authorization Engine" (or whatever helps you identify this application)
- For supported account types, select Accounts in this organizational directory only
- Leave the Redirect URI empty.
- In permissions, leave Grant admin consent to openid and offline_access permissions checked.\
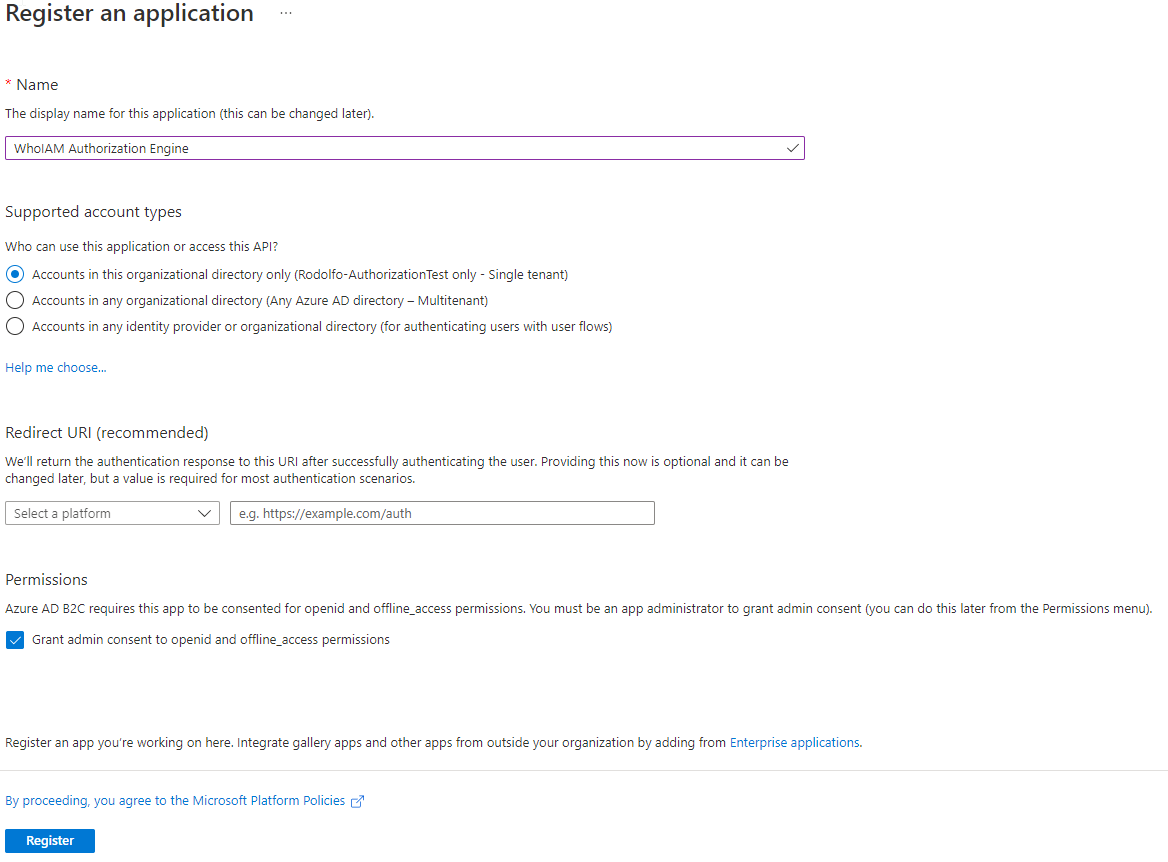
- Verify and hit register.
-
Your app registration will be created. Now add the required permissions.
- Click the API Permissions blade.
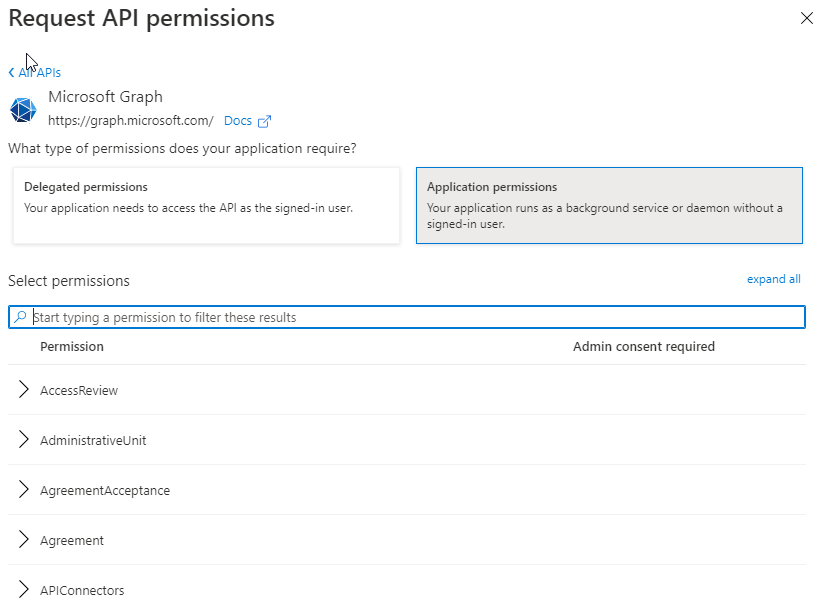
- Click on Add a permission.
- In the request API permissions dialog box, select Microsoft Graph.

- Select Application Permissions
- Search for and add the permissions Application.ReadWrite.All and User.ReadWrite.All
-
Now grant admin consent for your application

-
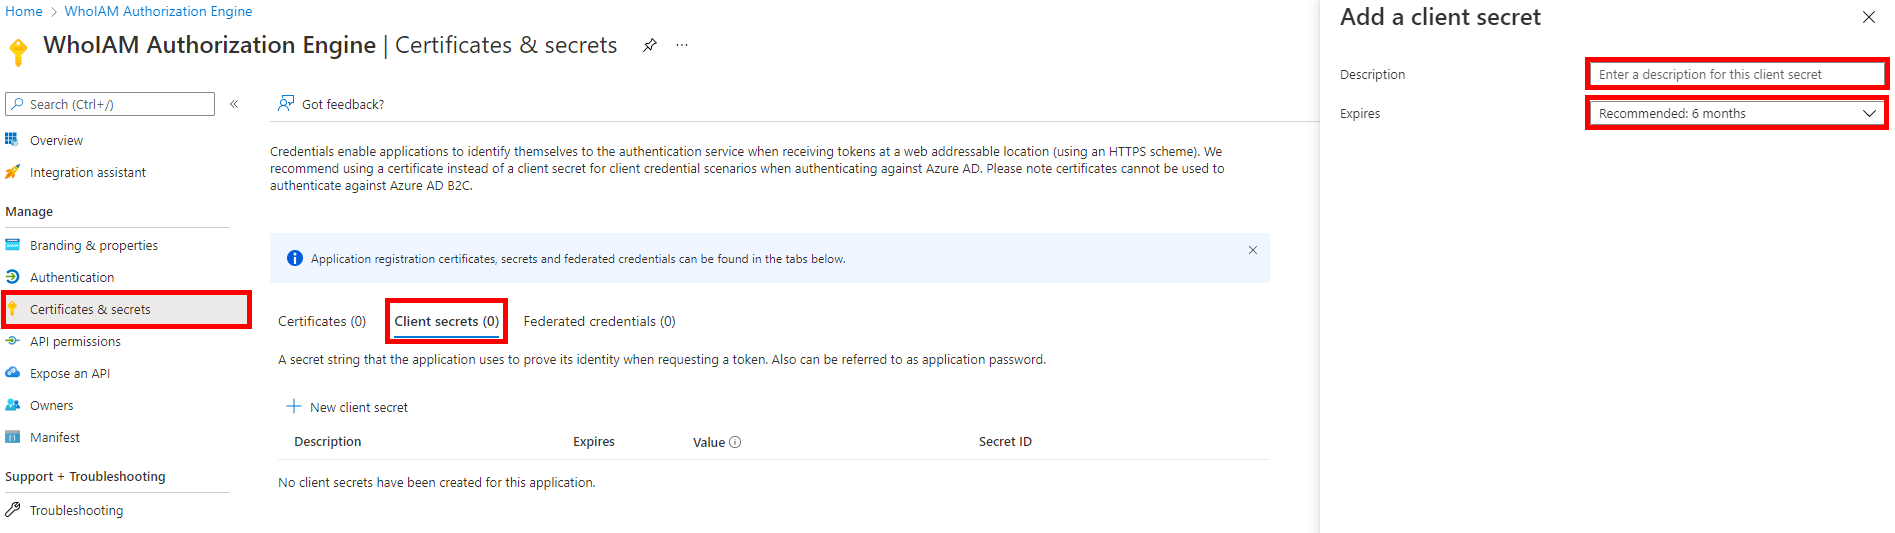
Once consent has been granted successfully, go to the Certificates & Secrets blade and add a Client secret. Provide a meaningful description and expiry.
-
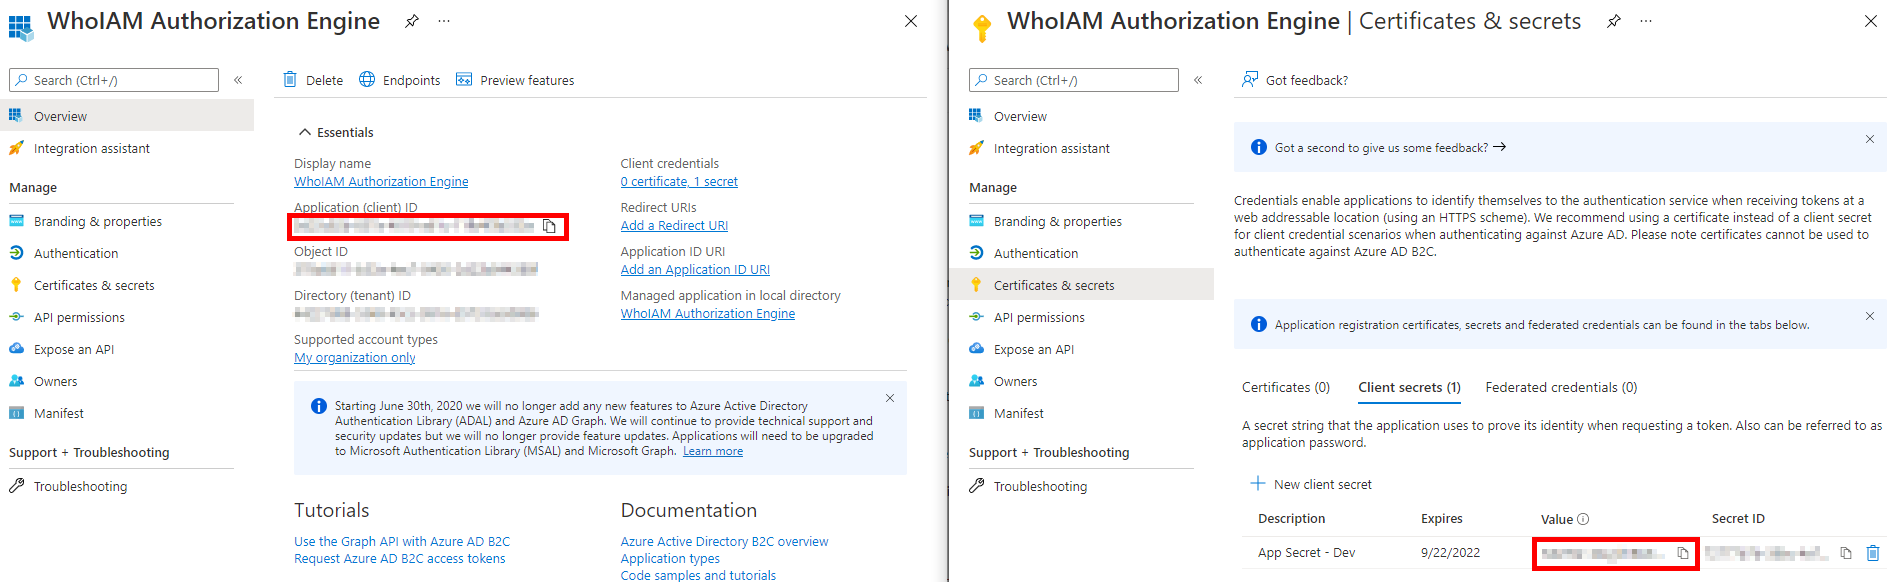
Note the generated client secret and the client ID of the application. You will need them to configure the Management API.
Create tenant secrets
- Navigate to "Policy keys"
- Create a new key and select "Manual"
- For the name, use
AccessRequestApiKey - For the value, use ApplicationAccessFunctionKeyValue
- Click "Save"
- Repeat the steps to map...
- (B2C KeyName)
InvitationRedemptionApiKey--> (Terraform) InvitationRedemptionFunctionKeyValue - (B2C KeyName)
PolicyExecutionApiKey--> (Terraform) AuthorizationPolicyExecutionFunctionKeyValue
Self-Signed Certificate for Invitations
TODO: this could be skippable, but B2C policy keys are required if all the policies should be uploaded
In the same B2C key management blade, choose "Upload"
- Run the certificate generation script in the Terraform repository in the "scripts" folder as administrator
- This will create a self-signed certificate for use with the invitations feature of RAMPART
- Enter a password for the script. Then, navigate to the
/assetsfolder and verify that aRAMPARTCert.pfxfile was created - Upload this cert and enter the password in B2C.
- Use
InvitationCertas the name
[!NOTE] You should now have the following keys:
B2C_1A_AccessRequestApiKey,B2C_1A_InvitationCert,B2C_1A_InvitationRedemptionApiKey,B2C_1A_PolicyExecutionApiKey. They'll be needed in the next section.
Release pipeline setup
Typically, RAMPART will exist in its' own pipeline, separate from B2C policy and UI deployments. However, since it relies on values from those deployments, we can create the following variable groups:
- B2C Policies
- RAMPART Core
- RAMPART Invitations
- RAMPART Password Reset
B2C Policy Variables
| Name | Value |
|---|---|
| AccessRequestApiBaseUrl | AccessRequestApiBaseUrl from Terraform |
| AccessRequestApiKeyName | B2C_1A_AccessRequestApiKey |
| APIMetadataUrl | RAMPART-APIMetadataUrl from Terraform |
| AppInsightsDeveloperMode | true for dev/test, false for production |
| AppInsightsInstrumentationKey | Instrumentation key of the App Insights resource to send B2C logs to |
| AzureIEFAppId | IdentityExperienceFramework application ID |
| AzureProxyIEFAppId | ProxyIdentityExperienceFramework app id |
| DeploymentMode | DeploymentMode="Development" or DeploymentMode="Production" depending on the environment |
| ExtensionsAppId | app ID of the extensions app |
| ExtensionsAppObjectId | object ID of the extensions app |
| IdTokenHintIssuer | A randomly generated GUID/UUID to use as the issuer for the invitation policy |
| InvitationCertificate | B2C_1A_InvitationCert |
| InvitationRedemptionApiBaseUrl | InvitationRedemptionApiBaseUrl from Terraform |
| InvitationRedemptionApiKeyName | B2C_1A_InvitationRedemptionApiKey |
| PolicyDeployAppId | Application ID of the policy deployment app registration Required to push policy updates. |
| PolicyDeployAppSecret | Secret of the policy deployment app registration. Required to push policy updates. |
| PolicyExecutionApiBaseUrl | PolicyExecutionApiBaseUrl from Terraform |
| PolicyExecutionApiKeyName | B2C_1A_PolicyExecutionApiKey |
| ScriptExecutionElement | <ScriptExecution>Allow</ScriptExecution> |
| StorageAccountName | StorageAccountName from Terraform |
| StorageBaseUrl | https://$(StorageAccountName).blob.core.windows.net/$(UIContainerName) |
| TenantGuid | Tenant ID of the B2C tenant. Find under any app registration |
| TenantShort | First part of the tenant name before .onmicrosoft.com (e.g. myorg in myorg.onmicrosoft.com) |
| UIBaseUrl | $(StorageBaseUrl)/ui/ |
| UIContainerName | Blob storage container for the ui (e.g. b2cui) |
RAMPART Core
| Name | Value |
|---|---|
| AzureAD-ClientId | ClientID of the AAD app registration |
| AzureAD-ClientSecret | Client secret of the AAD app registration |
| AzureAD-TenantId | Tenant ID of the AAD tenant |
| ApplicationInsights-ConnectionString | AppInsights-ConnectionString from Terraform |
| AzureADB2C-AppId | B2C app id from above |
| AzureADB2C-ClientSecret | B2C app registration client secret |
| AzureADB2C-TenantDomain | {tenantShort}.b2clogin.com |
| AzureADB2C-TenantFriendlyName | Short description of your B2C tenant |
| AzureAdB2C-TenantId | Tenant ID of your B2C tenant |
| CosmosDb-Account | CosmosDBEndpoint from Terraform |
| CosmosDb-DatabaseName | CosmosDBName from Terraform |
| CosmosDb-DBPrefix | CosmosDBPrefix from Terraform |
| CosmosDb-Key | CosmosDBPrimaryKey from Terraform |
Release pipeline setup

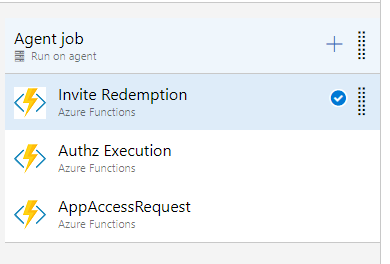
- Create a new release pipeline with the artifacts from the screenshot above
- Install the replace tokens task: https://marketplace.visualstudio.com/items?itemName=qetza.replacetokens
- Link the variable groups you just created above into the pipeline

Deploy UI/API to Azure
Use the following mapping for the App Service configuration settings
-AzureAD:TenantId "$(AzureAD-TenantId)" -AzureAD:ClientId "$(AzureAD-ClientId)" -AzureAD:ClientSecret "$(AzureAD-ClientSecret)" -AzureADB2C:TenantId "$(AzureADB2C-TenantId)" -AzureADB2C:TenantDomain "$(AzureADB2C-TenantDomain)" -AzureADB2C:TenantFriendlyName "$(AzureADB2C-TenantFriendlyName)" -AzureADB2C:AppId "$(AzureADB2C-AppId)" -AzureADB2C:ClientSecret "$(AzureADB2C-ClientSecret)" -AzureADB2C:B2CExtensionAppId "$(ExtensionsAppId)" -AzureADB2C:IdentityExperienceFrameworkAppId "$(AzureIEFAppId)" -AzureADB2C:ProxyIdentityExperienceFrameworkAppId "$(AzureProxyIEFAppId)" -AzureADB2C:PasswordReset:ApplicationId "$(AzureADB2C-PasswordReset-ApplicationId)" -AzureADB2C:PasswordReset:PolicyReturnUrl "$(AzureADB2C-PasswordReset-PolicyReturnUrl)" -AzureADB2C:PasswordReset:PolicyId "$(AzureADB2C-PasswordReset-PolicyId)" -AzureADB2C:PasswordReset:EmailFrom "$(AzureADB2C-PasswordReset-EmailFrom)" -AzureADB2C:PasswordReset:EmailTemplateId "$(AzureADB2C-PasswordReset-EmailTemplateId)" -AzureADB2C:Invitation:PolicyId "$(AzureADB2C-Invitation-PolicyId)" -AzureADB2C:Invitation:PolicyReturnUrl "$(AzureADB2C-Invitation-PolicyReturnUrl)" -AzureADB2C:Invitation:EmailFrom "$(AzureADB2C-Invitation-EmailFrom)" -AzureADB2C:Invitation:EmailTemplateId "$(AzureADB2C-Invitation-EmailTemplateId)" -AzureADB2C:Invitation:ExpirationDuration "$(AzureADB2C-Invitation-ExpirationDuration)" -AzureADB2C:Invitation:InvitationBaseUrl "$(AzureADB2C-Invitation-InvitationBaseUrl)" -AzureADB2C:Invitation:DefaultApplicationId "$(AzureADB2C-Invitation-DefaultApplicationId)" -AzureADB2C:MFAReset:Enabled "$(AzureADB2C-MFAReset-Enabled)" -CosmosDb:Account "$(CosmosDb-Account)" -CosmosDb:Key "$(CosmosDb-Key)" -CosmosDb:DatabaseName "$(CosmosDb-DatabaseName)" -CosmosDb:DBPrefix "$(CosmosDb-DBPrefix)" -SendGrid:ApiKey "$(SendGrid-ApiKey)" -AzureADB2C:CertificateThumbprint "$(AzureADB2C-CertificateThumbprint)" -WEBSITE_LOAD_CERTIFICATES "$(AzureADB2C-CertificateThumbprint)" -AzureADB2C:TokenIssuer "$(IdTokenHintIssuer)"
Deploy Function Apps
Use the function apps task in DevOps. Link the artifacts according to the Package or folder section in each app.
Invitation Redemption
Package or folder: $(System.DefaultWorkingDirectory)/_GateKeeperBuild/InvitationRedemption/*.zip
App Name: select from dropdown
Application and Configuration Settings --> App Settings:
-APPINSIGHTS_INSTRUMENTATIONKEY "$(AppInsightsInstrumentationKey)" -APPLICATIONINSIGHTS_CONNECTION_STRING "$(ApplicationInsights-ConnectionString)" -Cosmos:Account "$(CosmosDb-Account)" -Cosmos:DbPrefix "$(CosmosDb-DBPrefix)" -Cosmos:Key "$(CosmosDb-Key)" -FUNCTIONS_EXTENSION_VERSION ~4 -WEBSITE_ENABLE_SYNC_UPDATE_SITE true -Cosmos:DatabaseName "$(CosmosDb-DatabaseName)" -AzureADB2C:TenantDomain "$(AzureADB2C-TenantDomain)" -AzureADB2C:TenantId "$(AzureADB2C-TenantId)" -AzureADB2C:Invitation:PolicyId "$(AzureADB2C-Invitation-PolicyId)" -AzureADB2C:Invitation:DefaultApplicationId "$(AzureADB2C-Invitation-DefaultApplicationId)" -AzureADB2C:Invitation:PolicyReturnUrl "$(AzureADB2C-Invitation-PolicyReturnUrl)" -AzureADB2C:TokenIssuer "$(IdTokenHintIssuer)"
Authz Execution
Package or folder: $(System.DefaultWorkingDirectory)/_GateKeeperBuild/AuthorizationPolicyExecution/*.zip
App Name: select from dropdown
Application and Configuration Settings --> App Settings:
-APPINSIGHTS_INSTRUMENTATIONKEY $(AppInsightsInstrumentationKey) -APPLICATIONINSIGHTS_CONNECTION_STRING $(ApplicationInsights-ConnectionString) -Cosmos:Account $(CosmosDb-Account) -Cosmos:DbPrefix $(CosmosDb-DBPrefix) -Cosmos:Key $(CosmosDb-Key) -FUNCTIONS_EXTENSION_VERSION ~4 -WEBSITE_ENABLE_SYNC_UPDATE_SITE true -WEBSITE_RUN_FROM_PACKAGE 1 -Cosmos:DatabaseName $(CosmosDb-DatabaseName)
AppAccessRequest
Package or folder: $(System.DefaultWorkingDirectory)/_GateKeeperBuild/AuthorizationPolicyExecution/*.zip
App Name: select from dropdown
Application and Configuration Settings --> App Settings:
-APPINSIGHTS_INSTRUMENTATIONKEY $(AppInsightsInstrumentationKey) -APPLICATIONINSIGHTS_CONNECTION_STRING $(ApplicationInsights-ConnectionString) -Cosmos:Account $(CosmosDb-Account) -Cosmos:DbPrefix $(CosmosDb-DBPrefix) -Cosmos:Key $(CosmosDb-Key) -FUNCTIONS_EXTENSION_VERSION ~4 -WEBSITE_ENABLE_SYNC_UPDATE_SITE true -WEBSITE_RUN_FROM_PACKAGE 1 -Cosmos:DatabaseName $(CosmosDb-DatabaseName)
Run the release
Congratulations, the initial/core configuration is done! Run the release pipeline and WhoIAM RAMPART should be viewable.
Configure Invitations
Set up Sendgrid
The application requires SendGrid templates for Invitation and Reset emails.
SendGrid Prerequisites
- SendGrid account.
- Follow this [documentation] to create a SendGrid API. Ensure required permissions for Email Send are configured for the key.
- SendGrid documentation for reference.
- The template sample provided below is just for reference. Modify it according to the requirements.
SendGrid template for Invitations
-
SendGrid dynamic template documentation for reference here.
-
Create a dynamic template for Invitation Email in SendGrid. Record the template id.
-
Template input.
  {
      "email": "user email",
      "policyurl" : "Full b2c policy url for invitaiton",
      "tenantname": "Tenant name", //
      "message": "Message to be displayed to the user."
  }
Sample Template
<html xmlns="http://www.w3.org/1999/xhtml" dir="ltr" lang="en">
<head id="Head1">
<meta http-equiv="Content-Type" content="text/html; charset=utf-8">
<title>WaTech account invitation email</title>
<meta name="ROBOTS" content="NOINDEX, NOFOLLOW">
<!-- Template B O365 -->
<style>
table td {border-collapse:collapse;margin:0;padding:0;}
</style>
</head>
<body dir="ltr" lang="en">
<table width="100%" cellpadding="0" cellspacing="0" border="0" dir="ltr" lang="en">
<tr>
<td valign="top" width="50%"></td>
<td valign="top">
<!-- Email Header -->
<table width="640" cellpadding="0" cellspacing="0" border="0" dir="ltr" lang="en" style="border-left:1px solid #e3e3e3;border-right: 1px solid #e3e3e3;">
<tr style="background-color: #0072C6;">
<td width="1" style="background:#0072C6; border-top:1px solid #e3e3e3;"></td>
<td width="24" style="border-top:1px solid #e3e3e3;border-bottom:1px solid #e3e3e3;"> </td>
<td width="310" valign="middle" style="border-top:1px solid #e3e3e3; border-bottom:1px solid #e3e3e3;padding:12px 0;">
<h1 style="line-height:20pt;font-family:Segoe UI Light; font-size:18pt; color:#ffffff; font-weight:normal;">
<span id="HeaderPlaceholder_UserVerificationEmailHeader"><font color="#FFFFFF">You've been invited to access applications with in {{tenantname}}</font></span>
</h1>
</td>
<td width="24" style="border-top: 1px solid #e3e3e3;border-bottom: 1px solid #e3e3e3;"> </td>
</tr>
</table>
<!-- Email Content -->
<table width="640" cellpadding="0" cellspacing="0" border="0" dir="ltr" lang="en">
<tr>
<td width="1" style="background:#e3e3e3;"></td>
<td width="24"> </td>
<td id="PageBody" width="640" valign="top" colspan="2" style="border-bottom:1px solid #e3e3e3;padding:10px 0 20px;border-bottom-style:hidden;">
<table cellpadding="0" cellspacing="0" border="0">
<tr>
<td width="630" style="font-size:10pt; line-height:13pt; color:#000;">
<table cellpadding="0" cellspacing="0" border="0" width="100%" style="" dir="ltr" lang="en">
<tr>
<td>
<div style="font-family:'Segoe UI', Tahoma, sans-serif; font-size:14px; color:#333;">
<span id="BodyPlaceholder_UserVerificationEmailBodySentence1">Click the link below to create an account with {{email}}</span>
</div>
<br>
<div style="font-family:'Segoe UI', Tahoma, sans-serif; font-size:14px; color:#333;">
<span id="BodyPlaceholder_UserVerificationEmailBodySentence2">{{message}}</span>
</div>
<br>
<div style="font-family:'Segoe UI', Tahoma, sans-serif; font-size:14px; color:#333; font-weight: bold">
<a href={{policyurl}} target="_blank"> Accept Invitation </a>
</div>
<br>
<br>
<div style="font-family:'Segoe UI', Tahoma, sans-serif; font-size:14px; color:#333;">
Sincerely,
</div>
<div style="font-family:'Segoe UI', Tahoma, sans-serif; font-size:14px; font-style:italic; color:#333;">
{{tenantname}}
</div>
</td>
</tr>
</table>
</td>
</tr>
</table>
</td>
<td width="1"> </td>
<td width="1"></td>
<td width="1"> </td>
<td width="1" valign="top"></td>
<td width="29"> </td>
<td width="1" style="background:#e3e3e3;"></td>
</tr>
<tr>
<td width="1" style="background:#e3e3e3; border-bottom:1px solid #e3e3e3;"></td>
<td width="24" style="border-bottom:1px solid #e3e3e3;"> </td>
<td id="PageFooterContainer" width="585" valign="top" colspan="6" style="border-bottom:1px solid #e3e3e3;padding:0px;">
</td>
<td width="29" style="border-bottom:1px solid #e3e3e3;"> </td>
<td width="1" style="background:#e3e3e3; border-bottom:1px solid #e3e3e3;"></td>
</tr>
</table>
</td>
<td valign="top" width="50%"></td>
</tr>
</table>
<img src="https://mucp.api.account.microsoft.com/m/v2/v?d=AIAACWEPFYXYIUTJIJVV4ST7XLBHVI5MLLYBKJAVXHBDTBHUM5VBSVVPTTVRWDFIXJ5JQTHYOH5TUYIPO4ZAFRFK52UAMIS3UNIPPI7ZJNDZPRXD5VEJBN4H6RO3SPTBS6AJEEAJOUYL4APQX5RJUJOWGPKUABY&i=AIAACL23GD2PFRFEY5YVM2XQLM5YYWMHFDZOCDXUI2B4LM7ETZQO473CVF22PT6WPGR5IIE6TCS6VGEKO5OZIONJWCDMRKWQQVNP5VBYAINF3S7STKYOVDJ4JF2XEW4QQVNHMAPQNHFV3KMR3V3BA4I36B6BO7L4VQUHQOI64EOWPLMG5RB3SIMEDEHPILXTF73ZYD3JT6MYOLAZJG7PJJCAXCZCQOEFVH5VCW2KBQOKRYISWQLRWAT7IINZ3EFGQI2CY2EMK3FQOXM7UI3R7CZ6D73IKDI" width="1" height="1">
</body>
</html>
Sample template output

SendGrid template for Password Reset Email
Create a dynamic template for password reset emails in SendGrid. Record the template id.
Template input
{
    "email": "testuser@mailinator.com",
    "policyurl" : "reset password policy url here",
    "tenantname": "Test Tenant Name"
}
- Use a template similar to the one provided for the invitation email. Update the variable placeholders and text accordingly.
- Sample template output

Azure DevOps Variable Group
| Name | Value |
|---|---|
| AzureADB2C-CertificateThumbprint | AppservicePlan-CertificateThumbprint from Terraform |
| AzureADB2C-Invitation-DefaultApplicationId | The B2C application ID of the default app to invite users to |
| AzureADB2C-Invitation-EmailFrom | Source email from Sendgrid |
| AzureADB2C-Invitation-EmailTemplateId | Template ID from Sendgrid |
| AzureADB2C-Invitation-ExpirationDuration | Interval until invitation expiration in ISO8601 (e.g. P10D = 10 days, P1Y4M7D = 1 year, 4 months, 7 days) |
| AzureADB2C-Invitation-InvitationBaseUrl | e.g. https://{invitation-base-url}/api/InvitationRedirect?token= |
| AzureADB2C-Invitation-PolicyId | B2C policy name e.g. B2C_1A_REDEEMINVITATION |
| AzureADB2C-Invitation-PolicyReturnUrl | In the case of invitation flow failure, redirect the user to this url (e.g. https://jwt.ms) |
| SendGrid-ApiKey | Your SendGrid API key. See TODO for required scopes. |
Configure Password Reset
| Name | Value |
|---|---|
| AzureADB2C-MFAReset-Enabled | true or false - whether to enable the MFA reset feature |
| AzureADB2C-PasswordReset-ApplicationId | Application ID to point the password reset policy at. |
| AzureADB2C-PasswordReset-EmailFrom | Source/from email configured in SendGrid |
| AzureADB2C-PasswordReset-EmailTemplateId | Template ID from Sendgrid |
| AzureADB2C-PasswordReset-PolicyId | e.g. B2C_1A_PASSWORDRESET |
| AzureADB2C-PasswordReset-PolicyReturnUrl | URL of the application to redirect the user to after password reset |
Finishing up
Link the final two variable groups in the pipeline and run it.