Setup Guide
Spinning up an instance of the Authorization Engine involves the following resources
Azure Subscription
You should have an Azure subscription to create and use various Azure Resources. If you don't have one, create one here.
Azure Cosmos DB
We will be using Azure Cosmos DB as the backend database in our Authorization Engine. Refer to this document on how to create an Azure Cosmos DB Account and register a database in it.
We will be using CosmosDB's Core (SQL) API. Make sure to opt into it during the Cosmos DB setup . We also recommend enabling the Provision database throughput option when creating the database, as it allows you to share the throughput provisioned to the database across all the containers within the database. This option also helps with cost saving.
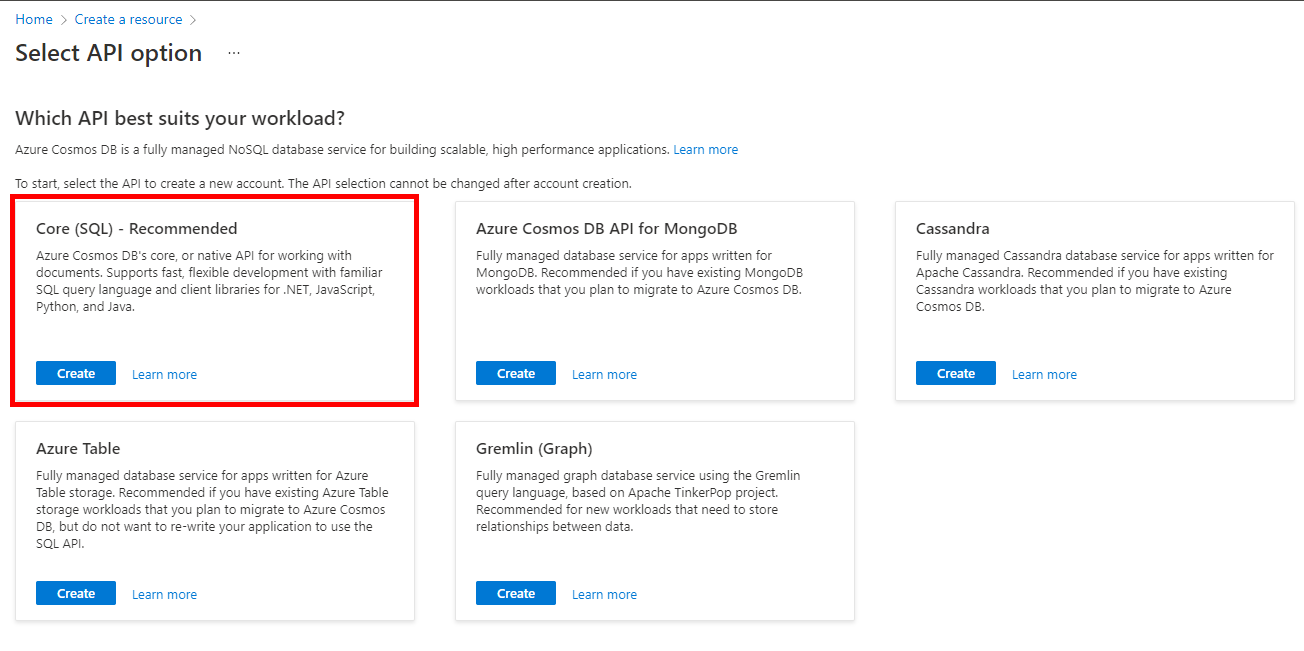
Create an Azure Cosmos DB Account
- From the Azure portal menu, or from the Home page, select Create a resource.
- In the Search box, enter Azure Cosmos DB.
- From the results list, choose Azure Cosmos DB.
- Press create on the Core (SQL) card. This will proceed you to the resource creation screen.
- Subscription: Choose a subscription.
- Under Resource Group, either choose to Create new and enter a resource group name or select an existing resource group.
- Enter an Account Name to identify your Azure Cosmos account.
- Choose a geographic location to host your Azure Cosmos DB account.
[!TIP] For minimum latency, make sure this is in the same region as where you wish to provision all your other resources.
- Leave all other fields to their default.
The creation process could take a few minutes. Once completed, go to Keys and make a note of the URI & PRIMARY KEY fields. We will need them later.
Policy Interactions
The solution presents 3 operations supported by 4 REST API endpoints that your authorization policies are expected to call.
The following diagram illustrates the interactions between the Sign-In/Sign-Up Policy and the Function Apps

[!NOTE] Invitations are a special use case that use a separate User Journey. More details available here
B2C Tenant
The B2C tenant whose users the Authorization Engine will be managing. This can be an existing B2C Tenant or a new one. The tenant must be configured as follows:
- Create an Azure AD B2C Tenant - skip if you already have a B2C Tenant.
- Register the Authorization Engine as an application within your B2C Tenant.
Registering the Authorization Engine within your B2C Tenant
The Authorization Engine uses application access tokens to connect to your tenant through Microsoft Graph. To acquire said tokens, an application must be registered for it with the necessary permissions.
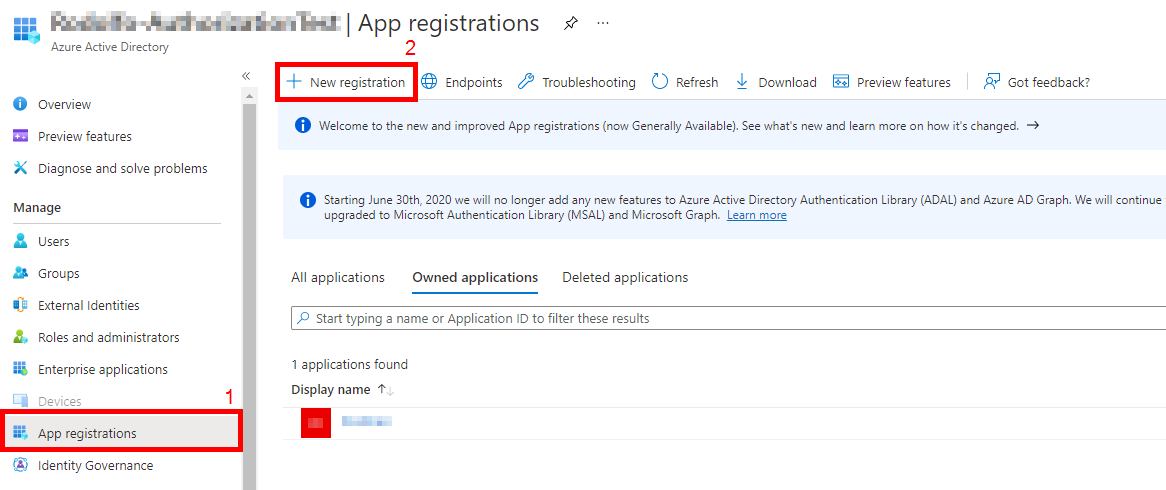
- Click this link to open the Azure Portal and load up Active Directory. Alternatively, open the Azure Portal and search for "Azure Active Directory". Make sure you're in your B2C Tenant.
- On the left blade, select App registrations and then New Registration.
- In the Register an Application menu:
- Provide the name as "WhoIAM Authorization Engine" (or whatever helps you identify this application)
- For supported account types, select Accounts in this organizational directory only
- Leave the Redirect URI empty.
- In permissions, leave Grant admin consent to openid and offline_access permissions checked.
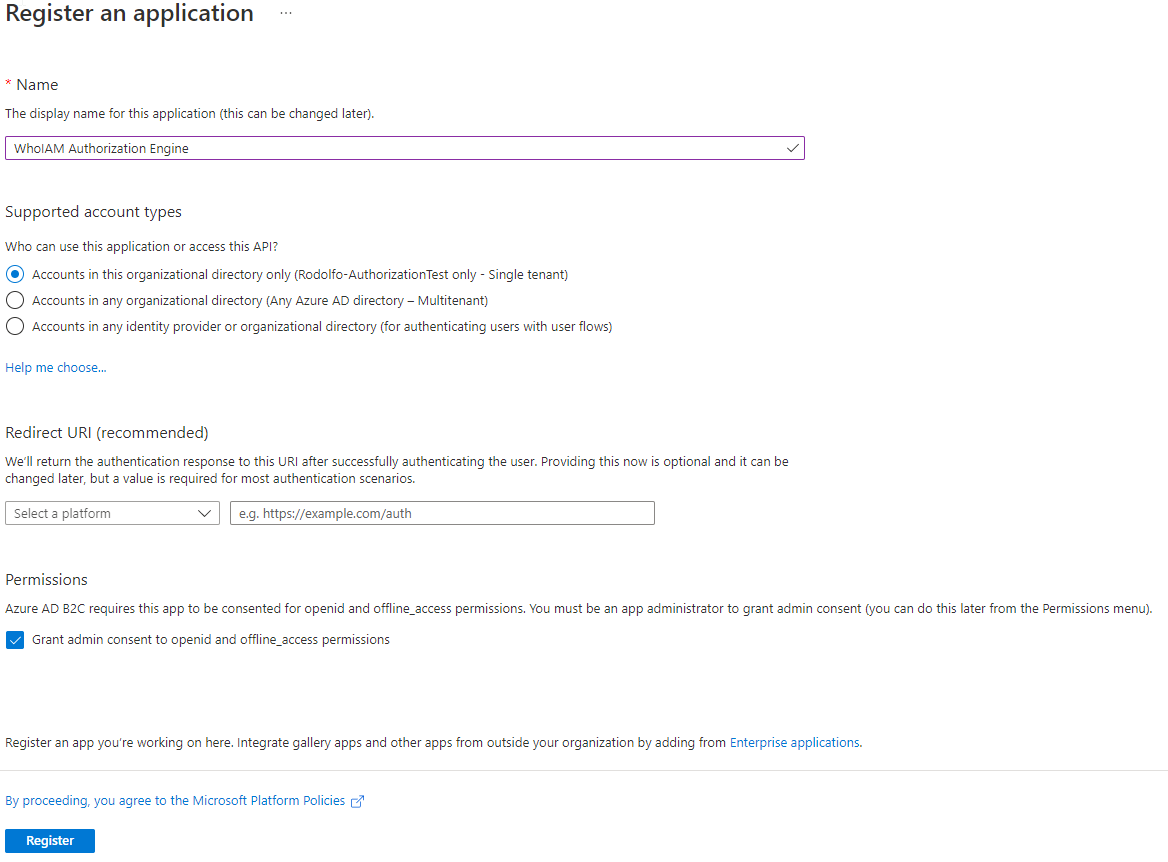
- Verify and hit register.
- Your app registration will be created. Now add the required permissions.
- Click the API Permissions blade.
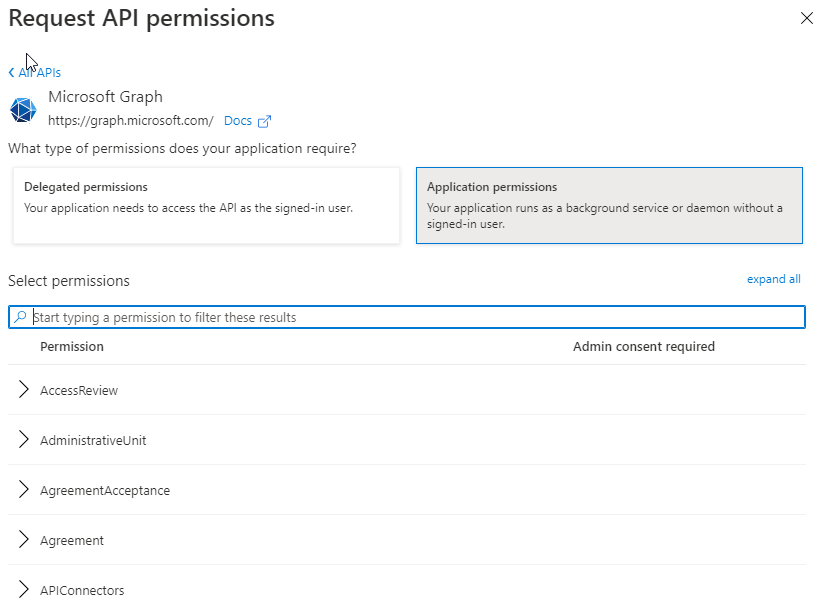
- Click on Add a permission.
- In the request API permissions dialog box, select Microsoft Graph.

- Select Application Permissions
- Search for and add the permissions Application.ReadWrite.All and User.ReadWrite.All
- Now grant admin consent for your application

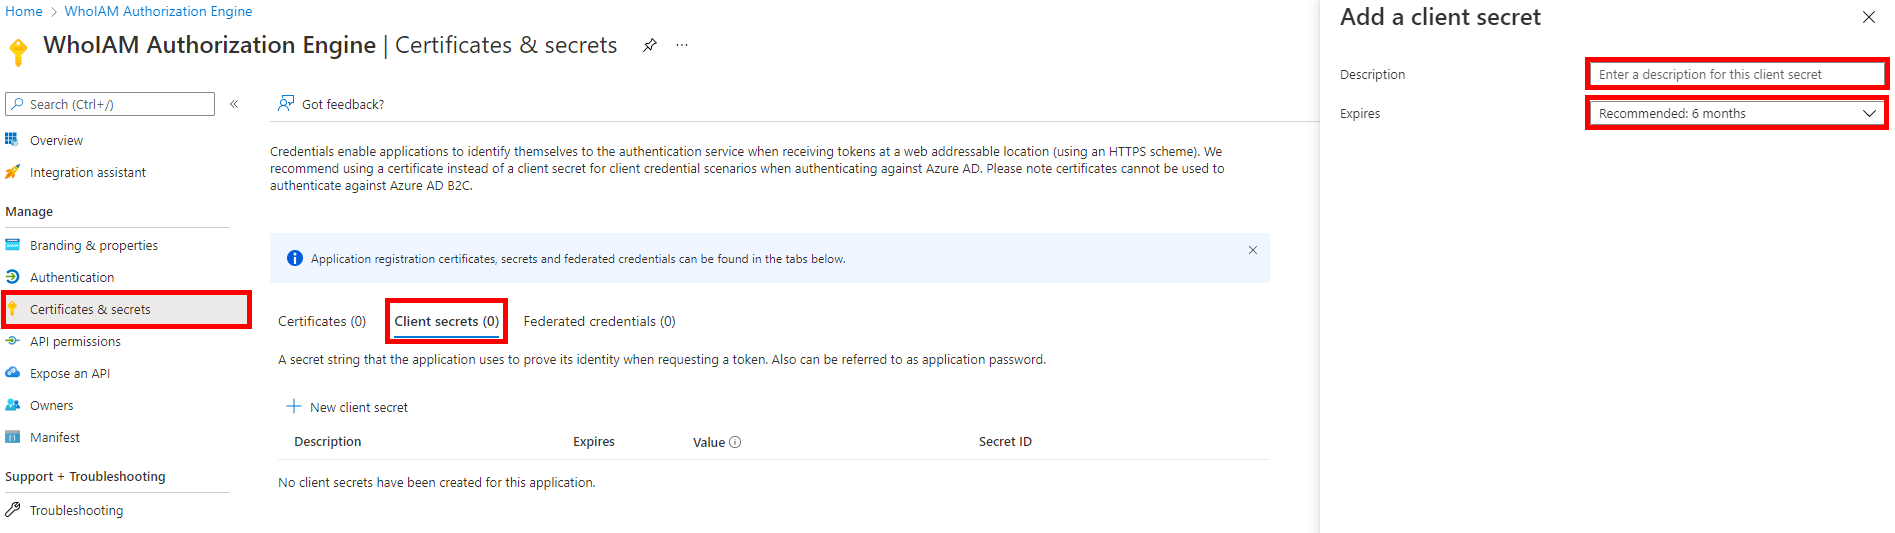
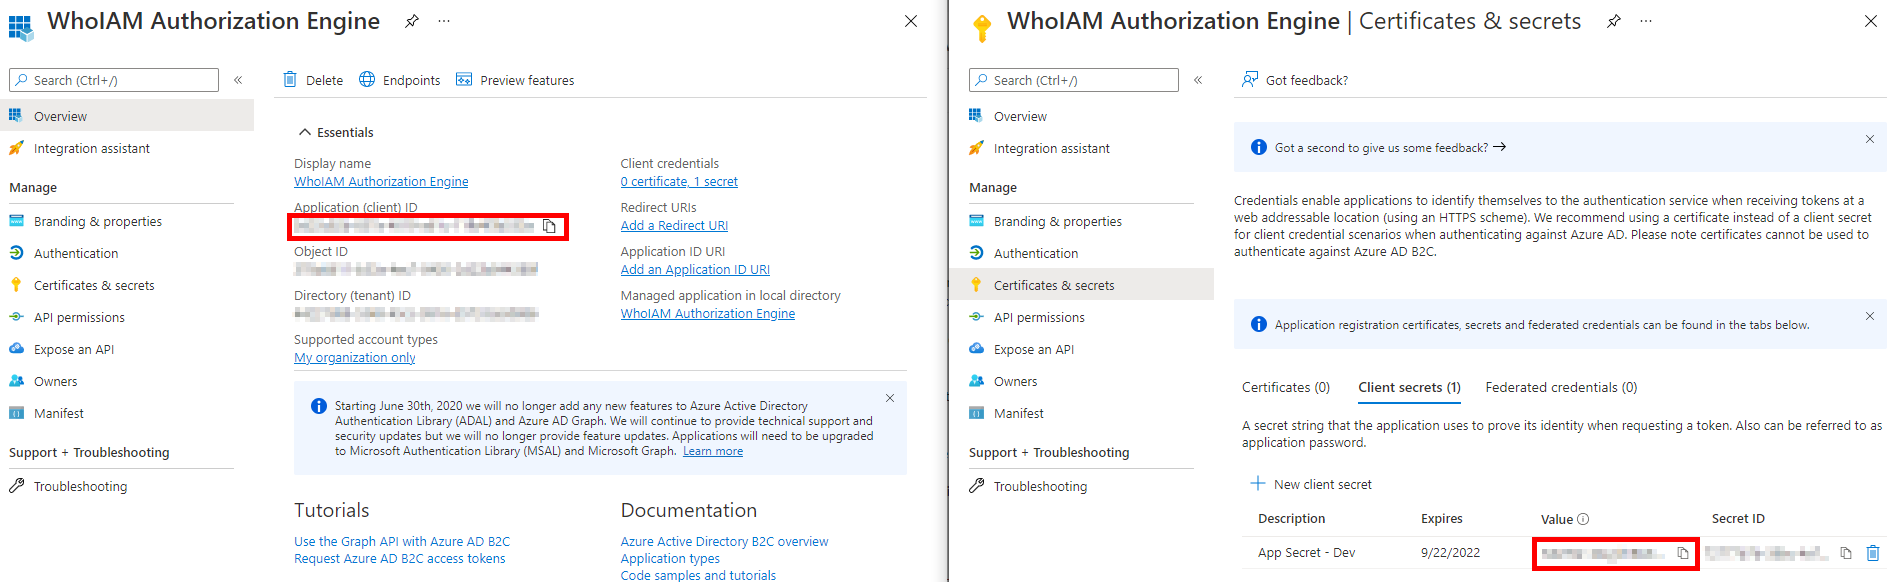
- Once consent has been granted successfully, go to the Certificates & Secrets blade and add a Client secret. Provide a meaningful description and expiry.
- Note the generated client secret and the client ID of the application. You will need them to configure the Management API.
Policy Interface - Function Apps
Each of these operations are hosted as individual Azure Functions instances for independent scaling and customization. Each of these endpoints will have a different volume usage. Eg. the Authorization Policy Execution endpoint will be hit once for every policy execution but request access and invitation redemption will only be called when their particular operation is performed/required. Refer to this document to learn how to create Azure Functions instances. They also need to be individually configured as mentioned below. As for the B2C Policies themselves, the policies that come with this solution already have these features integrated. You can use them as a starting point for your own custom policies, or integrate it into your existing custom policies.
All of them have the following common configurations
| Parameter | Example Value | Description | Where to find them |
|---|---|---|---|
| Cosmos:Account | https://{{yourcosmosaccount}}.documents.azure.com:443/ | The Cosmos DB account we created ealier | The URI value we saved from here |
| Cosmos:DatabaseName | IdentityGovernance | The database to use. | Use the same as in the Management API |
| Cosmos:DBPrefix | [Optional] | Prefix for containers | Use the same as in the Management API |
| Cosmos:Key | 6b%loZUO7fWABJWWp9~TeQGXFhoLqMTa1fomc... | Cosmos DB Account Key | The PRIMARY KEY value we saved from here |
Authorization Policy Execution
[1 endpoint, mandatory ] All policies managed by the Authorization Engine are expected to call and honor this endpoint. Returns the result of your configured authorization policy.
<TechnicalProfile Id="REST-AuthorizationPolicy">
    <DisplayName>WhoIAm Authorization policy execution</DisplayName>
    <Protocol Name="Proprietary" Handler="Web.TPEngine.Providers.RestfulProvider, Web.TPEngine, Version=1.0.0.0, Culture=neutral, PublicKeyToken=null" />
    <Metadata>
        <Item Key="ServiceUrl">{Settings:PolicyExecutionApiBaseUrl}/authorizationpolicyexecution</Item>
        <Item Key="SendClaimsIn">Body</Item>
        <Item Key="AuthenticationType">ApiKeyHeader</Item>
        <Item Key="AllowInsecureAuthInProduction">true</Item>
    </Metadata>
    <CryptographicKeys>
        <Key Id="x-functions-key" StorageReferenceId="{Settings:PolicyExecutionApiKeyName}" />
    </CryptographicKeys>
    <InputClaims>
        <InputClaim ClaimTypeReferenceId="objectId" />
        <InputClaim ClaimTypeReferenceId="appIdentifier" PartnerClaimType="appIdentifier" />
    </InputClaims>
    <OutputClaims>
        <OutputClaim ClaimTypeReferenceId="wiaAuthorizationResult" />
        <OutputClaim ClaimTypeReferenceId="wiaAuthorizationMessage" />
        <OutputClaim ClaimTypeReferenceId="wiaAuthorizationScope" />
        <OutputClaim ClaimTypeReferenceId="authExecutionClientId" PartnerClaimType="wiaClientId" />
    </OutputClaims>
    <OutputClaimsTransformations>
        <OutputClaimsTransformation ReferenceId="AuthorizationScopes" />
    </OutputClaimsTransformations>
    <UseTechnicalProfileForSessionManagement ReferenceId="SM-Noop" />
</TechnicalProfile>
This function app needs the following additional configurations:-
| Parameter | Example Value | Description | Where to find them |
|---|---|---|---|
| AzureADB2C:TenantId | 12345678-1234-1234-1234-1234567890ab | TenantId of the B2C app | B2C Tenant |
| AzureADB2C:AppId | 12345678-1234-1234-1234-1234567890ab | Application ID of your B2C graph app registration with app permissions to read applications | B2C app registrations |
| AzureADB2C:ClientSecret | 12345678-1234-1234-1234-1234567890ab | Client secret of the application mentioned above | B2C Tenant |
Request Access
[1 endpoint, feature-dependent] The Authorization Engine features an access mode that allows users to request access to an application. This would in turn show up as an approval request in the management end. For a detailed list of all access modes, click here. This endpoint must be implemented in your policy if you wish to utilize this feature.
<TechnicalProfile Id="REST-RequestAccess">
    <DisplayName>WhoIAm request access</DisplayName>
    <Protocol Name="Proprietary" Handler="Web.TPEngine.Providers.RestfulProvider, Web.TPEngine, Version=1.0.0.0, Culture=neutral, PublicKeyToken=null" />
    <Metadata>
        <Item Key="ServiceUrl">{Settings:AccessRequestApiBaseUrl}/applicationaccessrequest</Item>
        <Item Key="SendClaimsIn">Body</Item>
        <Item Key="AuthenticationType">ApiKeyHeader</Item>
        <Item Key="AllowInsecureAuthInProduction">true</Item>
    </Metadata>
    <CryptographicKeys>
        <Key Id="x-functions-key" StorageReferenceId="{Settings:AccessRequestApiKeyName}" />
    </CryptographicKeys>
    <InputClaims>
        <InputClaim ClaimTypeReferenceId="objectId" />
        <InputClaim ClaimTypeReferenceId="displayName" PartnerClaimType="name" />
        <InputClaim ClaimTypeReferenceId="signInNames.emailAddress" PartnerClaimType="email" />
        <InputClaim ClaimTypeReferenceId="authExecutionClientId" PartnerClaimType="clientId" />
    </InputClaims>
    <OutputClaims>
        <OutputClaim ClaimTypeReferenceId="wiaAuthorizationResult" />
        <OutputClaim ClaimTypeReferenceId="wiaAuthorizationMessage" />
    </OutputClaims>
    <UseTechnicalProfileForSessionManagement ReferenceId="SM-Noop" />
</TechnicalProfile>
This function app needs the following additional configurations:-
| Parameter | Example Value | Description | Where to find them |
|---|---|---|---|
| AzureADB2C:TenantId | 12345678-1234-1234-1234-1234567890ab | TenantId of the B2C app | B2C Tenant |
| AzureADB2C:AppId | 12345678-1234-1234-1234-1234567890ab | Application ID of your B2C graph app registration with app permissions to read applications | B2C app registrations |
| AzureADB2C:TenantDomain | yourtenant | Can be the default domain b2clogin domain or custom domain if available. This is used as a variable in access request notification mail. | B2C app registrations |
| AzureADB2C:ClientSecret | 12345678-1234-1234-1234-1234567890ab | Client secret of the application mentioned above | B2C Tenant |
| SendGrid:ApiKey | longsendgridkeyhere | SendGrid API key sending emails | Send Grid portal |
| AccessRequestNotification:EmailFrom | donotreply@yourdomain.com | From email to be used while sending Access request notification | |
| AccessRequestNotification:TemplateId | d-sdflklafi33432423kdkdfm | Send Grid template id for access request notification | Send Grid portal |
| AccessRequestNotification:EmailTo | admin@yourdomain.com | Email Id to which access request notifications are to be sent |
Invitation Redemption
[2 endpoints, feature-dependent] Invitations are a special use case that allows you to invite new users to your B2C Tenant. These endpoints handle the redemption and verification of said invitations. This endpoint must be implemented in your policy if you wish to utilize this feature. This function app needs the following additional configurations:-
| Parameter | Example Value | Description | Where to find them |
|---|---|---|---|
| AzureADB2C:Invitation:DefaultApplicationId | 12345678-1234-1234-1234-1234567890ab | Generic registration linked to landing page | B2C app registrations |
| AzureADB2C:Invitation:PolicyId | B2C_1A_YourPolicy | Full ID of Invitation Policy | In your policy set |
| AzureADB2C:Invitation:PolicyReturnUrl | https://your-landing-page.com | Landing page for users post invitation | Whatever was registered in the default application |
| AzureADB2C:Invitation:ExpirationDuration | P10D | Duration after which invitations will expire (ISO8601 format) | Whatever was registered in the management application |
| InvitationSettings:TenantDomain | yourtenant.b2clogin.com | Can be the default b2clogin domain or custom doamin if available | B2C Tenant |
| InvitationSettings:TenantId | 12345678-1234-1234-1234-1234567890ab | Tenant ID of B2C Tenant | B2C Tenant |
-
Validate Invitation
<TechnicalProfile Id="REST-ValidateInvitation">
    <DisplayName>WhoIAM request access</DisplayName>
    <Protocol Name="Proprietary" Handler="Web.TPEngine.Providers.RestfulProvider, Web.TPEngine, Version=1.0.0.0, Culture=neutral, PublicKeyToken=null" />
    <Metadata>
        <Item Key="ServiceUrl">{Settings:InvitationRedemptionApiBaseUrl}/ValidateInvitation</Item>
        <Item Key="SendClaimsIn">Body</Item>
        <Item Key="AuthenticationType">ApiKeyHeader</Item>
        <Item Key="AllowInsecureAuthInProduction">true</Item>
    </Metadata>
    <CryptographicKeys>
        <Key Id="x-functions-key" StorageReferenceId="{Settings:InvitationRedemptionApiKeyName}" />
    </CryptographicKeys>
    <InputClaims>
        <InputClaim ClaimTypeReferenceId="email" />
        <InputClaim ClaimTypeReferenceId="clientId" DefaultValue="{OIDC:ClientId}" AlwaysUseDefaultValue="true" />
        <InputClaim ClaimTypeReferenceId="invitationId" />
    </InputClaims>
    <OutputClaims>
        <OutputClaim ClaimTypeReferenceId="wiaisInvitationValid" PartnerClaimType="isInvitationValid" DefaultValue="false" />
    </OutputClaims>
    <UseTechnicalProfileForSessionManagement ReferenceId="SM-Noop" />
</TechnicalProfile> -
Redeem Invitation
<TechnicalProfile Id="REST-InvitationRedemptionV2">
    <DisplayName>WhoIAM request access</DisplayName>
    <Protocol Name="Proprietary" Handler="Web.TPEngine.Providers.RestfulProvider, Web.TPEngine, Version=1.0.0.0, Culture=neutral, PublicKeyToken=null" />
    <Metadata>
        <Item Key="ServiceUrl">{Settings:InvitationRedemptionApiBaseUrl}/invitationredemptionv2</Item>
        <Item Key="SendClaimsIn">Body</Item>
        <Item Key="AuthenticationType">ApiKeyHeader</Item>
        <Item Key="AllowInsecureAuthInProduction">true</Item>
    </Metadata>
    <CryptographicKeys>
        <Key Id="x-functions-key" StorageReferenceId="{Settings:InvitationRedemptionApiKeyName}" />
    </CryptographicKeys>
    <InputClaims>
        <InputClaim ClaimTypeReferenceId="objectId" />
        <InputClaim ClaimTypeReferenceId="email" />
        <InputClaim ClaimTypeReferenceId="clientId" DefaultValue="{OIDC:ClientId}" AlwaysUseDefaultValue="true" />
        <InputClaim ClaimTypeReferenceId="invitationId" />
    </InputClaims>
    <OutputClaims>
        <OutputClaim ClaimTypeReferenceId="wiaInvitationRedeemed" PartnerClaimType="WiaInvitationRedeemed" DefaultValue="false" />
    </OutputClaims>
    <UseTechnicalProfileForSessionManagement ReferenceId="SM-Noop" />
</TechnicalProfile>
Azure App Service for Management API
The management API comes as a .NET 6.0 application which is meant to be hosted in an Azure App Service instance. The application also serves an Angular frontend which is easy and intuitive, but all the APIs are accessible via the included Powershell cmdlets, or you can also develop your own tooling from scratch.
Possible TODO: Present a way how users can access the OpenAPI documentation and Swagger page
[!NOTE] Refer to this document on how to create an Azure APP Service for .Net Core 6.0. Make sure you create the app service under the Runtime Stack .NET 6 (LTS).
Create an Azure App Service
- From the Azure portal menu, or from the Home page, select Create a resource.
- In the Search box, enter Web App.
- From the results list, choose Web App.
- Subscription: Choose a subscription.
- Under Resource Group, either choose to Create new and enter a resource group name or select an existing resource group. (ideally the same as previous resources)
- Name: A unique name is required.
- Publish: Select Code.
- Runtime Stack: Choose .NET 6 (LTS)
- Operating System: Select Windows
- Region: Choose a location (Ideally adjacent to your Cosmos DB instance)
- Under App Service Plan, either choose to Create new and enter a App Service Plan Name or select an existing App Service Plan.
[!NOTE] In order to use the invitations feature, we need to be able to add a private key certificate to the App Service. So if that feature is required, you'll need an App Service Plan Tier that supports it. (B1 Tier and above)
Endpoint Protection
API endpoints work with sensitive information and are therefore secured with Azure AD. You will need to register the application in an Azure AD tenant. This could be in the B2C tenant itself or within a separate tenant altogether.
Registering the Application
We need an application that can issue tokens and control access to the Management API. This application may be registered in the tenant where you have the users you intend to grant access to the application (E.g. your main tenant) or inside your B2C tenant itself. Note however, that the management application is designed to honor User Roles from the tenant you are authenticating against.
[!NOTE] You can configure a list of tenant roles that will have admin access to the management app and all features, but note that this is in respect to the tenant where the application is registered and not the B2C tenant.
Follow these steps to register an application for your management app.
[!NOTE] Documentations for reference Register an application with the Microsoft Identity Platform Expose a scope Grant scoped permission
- Log on to the corresponding Azure portal directory with a user having administrative rights.
- Go to Azure Active Directory > App Registration.
- Register a new application under new registration.
- Give an appropriate name to the application.
- Under Supported account types, select Accounts in this organizational directory only ( tenantname - Single tenant).
- Open the newly created application and go to the Authentication tab.
- Under platform configurations, add a redirect URI as given below
- Select 'Add a platform'
- Select 'Single-page application' from the modal.
- Set Redirect URI in the format
{siteurl}/auth. - Get the application's base url from the app service and replace the
{siteurl}. Eg: If the siteurl ishttps://mytestapplicationurl.com, the Redirect URI should be set ashttps://mytestapplicationurl.com/auth
- Make sure Access tokens and ID tokens are selected under Implicit grant and hybrid flows.
- Find Advanced settings and set 'Allow public client flows' to Yes.
- Go to the Certificates & secrets tab, and add a new client secret. Record this secret value.
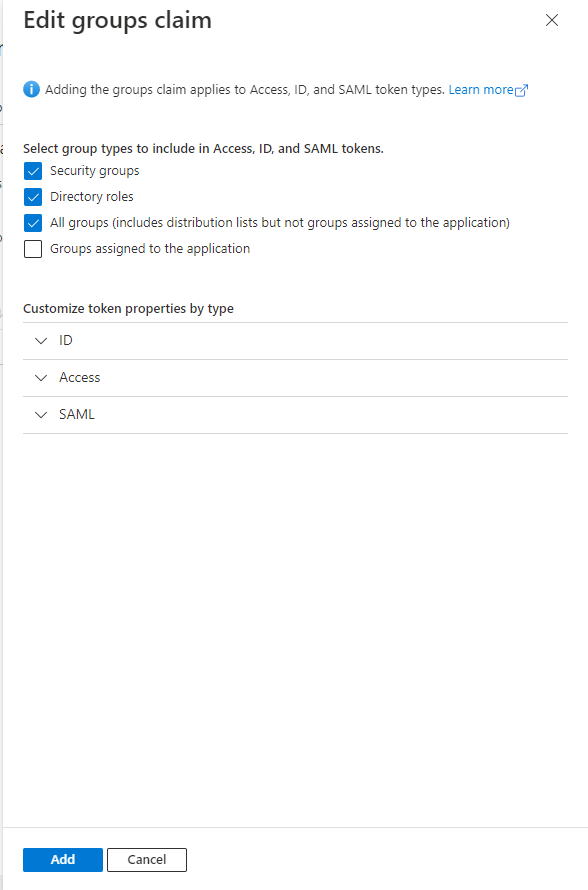
- Go to Token configuration and select Add groups claim. In the modal that opens up, select all checkboxes and save.
 10. Go to Expose an API tab and add a scope by following the steps below
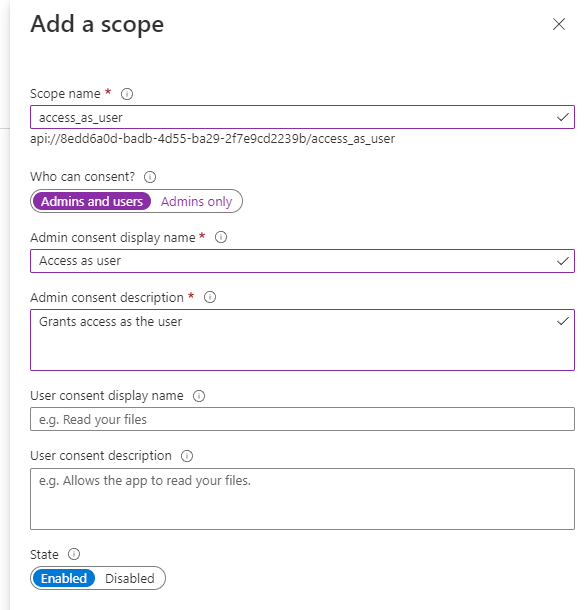
- Select Add a scope and click Save and continue from modal.
- On the next page, set the scope name as
access_as_user. - Set Admins and users for Who can consent?
- Provide Admin consent display name and Admin consent description.
- Ensure state is Enabled and save it.
 11. Select Add a client application, provide the application's id as the Client ID and select the
 access_as_user scope that was previously created and save it.
12. Go to the API Permission tab and configure it by following the steps given below.
- Add Group.Read.All, GroupMember.Read.All, User.Read.All Microsoft Graph application permissions.
- Add the
access_as_userpermission created from Add a permission > My APIs > Select the current application. - Grant admin consent for these permissions.

Configure your App Service
API
There is an appsettings.json file in the Management API project and this is where we keep our configuration settings. Edit the file and add your values where needed.
[!WARNING] Make sure you don't save any sensitive data here like secrets or keys, especially if you are using any form of version control with remotes like Git. In the Management API, these are:
- AzureAD:ClientSecret
- AzureADB2C:ClientSecret
- CosmosDb:Key
- SendGrid:ApiKey
Use the app service configuration feature or Key Vault to store secrets.
Here are all the configurations and what they mean:
{
    //Shortened for berevity
    "AzureAD": {
    "Instance": "https://login.microsoftonline.com/", // Instance wher your sign in app registration is located
    "TenantId": "12345678-1234-1234-1234-1234567890ab", // Tenant ID where your user sign in app is located
    "ClientId": "12345678-1234-1234-1234-1234567890ab",     // Application ID of registered app
    "ClientSecret": "6b%loZUO7fWABJWWp9~TeQGXFhoLqMTa1fomc" // and secret
  },
  "AdminRoles": {  // Tenant roles you want to grant administrator privileges to. Add as many as you need. Note that this is in respect to your sign in tenant
    "GlobalAdministrator": "62e90394-69f5-4237-9190-012177145e10",
    "Application Administrator": "9b895d92-2cd3-44c7-9d02-a6ac2d5ea5c3"
  },
  "AzureADB2C": {
    "TenantId": "12345678-1234-1234-1234-1234567890ab", // B2C Tenant ID
    "TenantDomain": "{mytenant}.b2clogin.com", // B2C Tenant Domain. Can be the default b2clogin.com or a custom domain if one is registered in the tenant
    "TenantFriendlyName": "My B2C Tenant", // An easily identifiable name for your B2C tenant. Visual only
    "AppId": "12345678-1234-1234-1234-1234567890ab",         // ID of your B2C graph app registration
    "ClientSecret": "6b%loZUO7fWABJWWp9~TeQGXFhoLqMTa1fomc", // and secret
    "B2CExtensionAppId": "12345678-1234-1234-1234-1234567890ab", // ID of default "b2c-extensions-app..." created by default in your B2C tenant
    "IdentityExperienceFrameworkAppId": "12345678-1234-1234-1234-1234567890ab",      // This is created when you configure your tenant for custom policies
    "ProxyIdentityExperienceFrameworkAppId": "12345678-1234-1234-1234-1234567890ab", // This one too
    "TokenIssuer": "https://whoiam-ig-invitation.azurewebsites.net", // Invitation token parameter
    "CertificateThumbprint": "GDEGX3UYEUWSRJCLNE9V54TTFQ2YZZCY7YJMMWL9",
    "B2CExtensionAttributes": [ // Register your extension attributes in this format to have it processed by the Authorization Engine. Add as many as needed.
      {
        "Name": "testvalue",
        "Type": "text",
        "FriendlyName": "Test Value"
      },
      {
        "Name": "forceMFAReset",
        "Type": "boolean",
        "FriendlyName": "Force user to reset mfa"
      },
      {
        "Name": "testnumber",
        "Type": "number",
        "FriendlyName": "Test Number"
      }
    ],
    "PasswordReset": {
      "ApplicationId": "12345678-1234-1234-1234-1234567890ab", // ID of password reset application. Users will be signed into this application post password reset.
      "PolicyReturnUrl": "https://jwt.ms", // Redirects user here after password reset. Must be registered in the application.
      "PolicyId": "B2C_1A_PASSWORDRESET", // Password reset policy. This policy is part of the included policy set.
      "EmailFrom": "noreply.rampart@whoiam.ai", // From Email for password reset emails. Email Id or domain must be registered with your mail provider.
      "EmailTemplateId": "d-f2c6e189620f42f6987986a695ce2ee5" // Sendgrid template ID of forgot password email
    },
    "Invitation": {
      "PolicyId": "B2C_1A_REDEEMINVITATION", // Invitation processing policy. This policy is part of the included policy set.
      "DefaultApplicationId": "12345678-1234-1234-1234-1234567890ab", // ID of invitation handling application
      "PolicyReturnUrl": "https://jwt.ms", // redirects users here after invitation. Must be registered in application
      "EmailFrom": "welcome.rampart@whoiam.ai", // From email for invitations. Email Id or domain must be registered with your mail provider.
      "EmailTemplateId": "d-8d4a78406bf5f211aff9a411a4f4acdc",
      "ExpirationDuration": "P10D", // ISO 8601 duration format - P(n)Y(n)M(n)DT(n)H(n)M(n)S
      "InvitationBaseUrl": "https://yourapp.azurewebsites.net/api/InvitationRedirect?token=" // Invitation link handler
    },
    "https": null,
    "MFAReset": {
      "Enabled": "true",
      "ExtensionAttributeName": "forceMFAReset" // attribute used for MFA reset enforcement. Must be same as used in policy
    },
    "Contact": {
      "Email": "support.rampart@whoiam.ai", // Display only
      "Phone": "+12345678901",  // Display only
      "Docs": "https://docs.rampart.whoiamdemos.com" // Your documentation website
    }
  },
  "CosmosDb": {
    "Account": "https://youraccount.documents.azure.com:443/", // From your Cosmos DB Instance
    "Key": "39zXZ8nVga2tEqxHu5NvhHdDUDaHMKhtMFAy2guXQSqBmnYyJECCygq4gXTFeJHLScbMhb5gVWr2YHU95khNpa==", // From your Cosmos DB Instance
    "DatabaseName": "IdentityGovernance", // Use any - as per environment and instance requirements
    "DBPrefix": "" // Use any - as per environment and instance requirements
  },
  "SendGrid": {
    "ApiKey": "SG.kmBVW4JRqpBJe3xRa3XyRzZYfhCmhdvXzMZZYV5yR8JdY53qNYKmARACedgXkxFaZhq"
  }
}
[!NOTE] Make sure that
DatabaseNameandDBPrefixare the same across all resources of a same instance and environment
Frontend
While the frontend app will load most of the configurations from the API, it is necessary to provide authentication information directly to it. These are as follows:-
//environment.ts <development> / environment.prod.ts <production>
export const environment = {
  production: true,
  apiUrl: "",
  configEndpoint:"api/Config/GetConfig",
  azureADClientId: "{{your-registered-apps-client-id}}",  //replace this with your registered app's client ID
  azureADAuthority: "https://login.microsoftonline.com/{{your-registered-apps-tenant-id}}", // replace this with your registered app's tenant ID
  appInsights: { //optional
    instrumentationKey: '89b955c4-b0a3-4b93-9dc5-c7a308dda461',
    applicationName: "Authorization Helpdesk SPA"
  }
};
This goes into environment.ts for development and environment.prod.ts for production.
SendGrid Configuration
The application requires SendGrid templates for Invitation, Reset emails and notification for Application access request.
SendGrid Prerequisites
- SendGrid account.
- Follow this [documentation] to create a SendGrid API. Ensure required permissions for Email Send are configured for the key.
- SendGrid documentation for reference.
- The template sample provided below is just for reference. Modify it according to the requirements.
SendGrid template for Invitations
-
SendGrid dynamic template documentation for reference here.
-
Create a dynamic template for Invitation Email in SendGrid. Record the template id.
-
Template input.
  {
      "email": "user email",
      "policyurl" : "Full b2c policy url for invitaiton",
      "tenantname": "Tenant name", //
      "message": "Message to be displayed to the user."
  }
-Sample Template
<html xmlns="http://www.w3.org/1999/xhtml" dir="ltr" lang="en">
<head id="Head1">
<meta http-equiv="Content-Type" content="text/html; charset=utf-8">
<title>WaTech account invitation email</title>
<meta name="ROBOTS" content="NOINDEX, NOFOLLOW">
<!-- Template B O365 -->
<style>
table td {border-collapse:collapse;margin:0;padding:0;}
</style>
</head>
<body dir="ltr" lang="en">
<table width="100%" cellpadding="0" cellspacing="0" border="0" dir="ltr" lang="en">
<tr>
<td valign="top" width="50%"></td>
<td valign="top">
<!-- Email Header -->
<table width="640" cellpadding="0" cellspacing="0" border="0" dir="ltr" lang="en" style="border-left:1px solid #e3e3e3;border-right: 1px solid #e3e3e3;">
<tr style="background-color: #0072C6;">
<td width="1" style="background:#0072C6; border-top:1px solid #e3e3e3;"></td>
<td width="24" style="border-top:1px solid #e3e3e3;border-bottom:1px solid #e3e3e3;"> </td>
<td width="310" valign="middle" style="border-top:1px solid #e3e3e3; border-bottom:1px solid #e3e3e3;padding:12px 0;">
<h1 style="line-height:20pt;font-family:Segoe UI Light; font-size:18pt; color:#ffffff; font-weight:normal;">
<span id="HeaderPlaceholder_UserVerificationEmailHeader"><font color="#FFFFFF">You've been invited to access applications with in {{tenantname}}</font></span>
</h1>
</td>
<td width="24" style="border-top: 1px solid #e3e3e3;border-bottom: 1px solid #e3e3e3;"> </td>
</tr>
</table>
<!-- Email Content -->
<table width="640" cellpadding="0" cellspacing="0" border="0" dir="ltr" lang="en">
<tr>
<td width="1" style="background:#e3e3e3;"></td>
<td width="24"> </td>
<td id="PageBody" width="640" valign="top" colspan="2" style="border-bottom:1px solid #e3e3e3;padding:10px 0 20px;border-bottom-style:hidden;">
<table cellpadding="0" cellspacing="0" border="0">
<tr>
<td width="630" style="font-size:10pt; line-height:13pt; color:#000;">
<table cellpadding="0" cellspacing="0" border="0" width="100%" style="" dir="ltr" lang="en">
<tr>
<td>
<div style="font-family:'Segoe UI', Tahoma, sans-serif; font-size:14px; color:#333;">
<span id="BodyPlaceholder_UserVerificationEmailBodySentence1">Click the link below to create an account with {{email}}</span>
</div>
<br>
<div style="font-family:'Segoe UI', Tahoma, sans-serif; font-size:14px; color:#333;">
<span id="BodyPlaceholder_UserVerificationEmailBodySentence2">{{message}}</span>
</div>
<br>
<div style="font-family:'Segoe UI', Tahoma, sans-serif; font-size:14px; color:#333; font-weight: bold">
<a href={{policyurl}} target="_blank"> Accept Invitation </a>
</div>
<br>
<br>
<div style="font-family:'Segoe UI', Tahoma, sans-serif; font-size:14px; color:#333;">
Sincerely,
</div>
<div style="font-family:'Segoe UI', Tahoma, sans-serif; font-size:14px; font-style:italic; color:#333;">
{{tenantname}}
</div>
</td>
</tr>
</table>
</td>
</tr>
</table>
</td>
<td width="1"> </td>
<td width="1"></td>
<td width="1"> </td>
<td width="1" valign="top"></td>
<td width="29"> </td>
<td width="1" style="background:#e3e3e3;"></td>
</tr>
<tr>
<td width="1" style="background:#e3e3e3; border-bottom:1px solid #e3e3e3;"></td>
<td width="24" style="border-bottom:1px solid #e3e3e3;"> </td>
<td id="PageFooterContainer" width="585" valign="top" colspan="6" style="border-bottom:1px solid #e3e3e3;padding:0px;">
</td>
<td width="29" style="border-bottom:1px solid #e3e3e3;"> </td>
<td width="1" style="background:#e3e3e3; border-bottom:1px solid #e3e3e3;"></td>
</tr>
</table>
</td>
<td valign="top" width="50%"></td>
</tr>
</table>
<img src="https://mucp.api.account.microsoft.com/m/v2/v?d=AIAACWEPFYXYIUTJIJVV4ST7XLBHVI5MLLYBKJAVXHBDTBHUM5VBSVVPTTVRWDFIXJ5JQTHYOH5TUYIPO4ZAFRFK52UAMIS3UNIPPI7ZJNDZPRXD5VEJBN4H6RO3SPTBS6AJEEAJOUYL4APQX5RJUJOWGPKUABY&i=AIAACL23GD2PFRFEY5YVM2XQLM5YYWMHFDZOCDXUI2B4LM7ETZQO473CVF22PT6WPGR5IIE6TCS6VGEKO5OZIONJWCDMRKWQQVNP5VBYAINF3S7STKYOVDJ4JF2XEW4QQVNHMAPQNHFV3KMR3V3BA4I36B6BO7L4VQUHQOI64EOWPLMG5RB3SIMEDEHPILXTF73ZYD3JT6MYOLAZJG7PJJCAXCZCQOEFVH5VCW2KBQOKRYISWQLRWAT7IINZ3EFGQI2CY2EMK3FQOXM7UI3R7CZ6D73IKDI" width="1" height="1">
</body>
</html>
- Sample template output

SendGrid template for Password Reset Email
Create a dynamic template for password reset emails in SendGrid. Record the template id.
- Template input
{
    "email": "testuser@mailinator.com",
    "policyurl" : "reset password policy url here",
    "tenantname": "Test Tenant Name"
}
- Use a template similar to the one provided for the invitation email. Update the variable placeholders and text accordingly.
- Sample template output

SendGrid template for Application Access Request Email
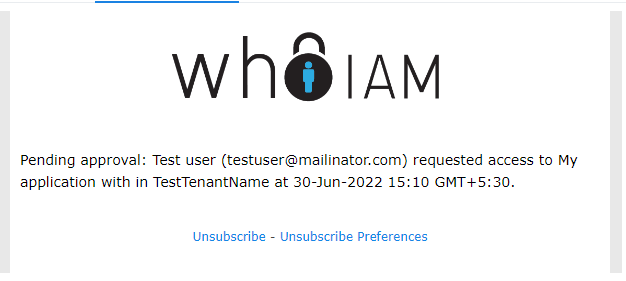
Create a dynamic template in SendGrid to notify that a new application access request has been created (A user assignment will be created in pending state waiting for approval). Record the template id. This email will be sent to an email address configured for the Application Access Request FunctionApp.
- Template input
{
    "requester_name": "Test user",
    "requester_email": "testuser@mailinator.com",
    "application_name": "My application",
    "tenantname": "TestTenantName",
    "time": "30-Jun-2022 15:10 GMT+5:30"
}
- Use a template similar to the one provided for the invitation email with approriate text changes. Update the variable placeholders and text accordingly.
- Sample template output